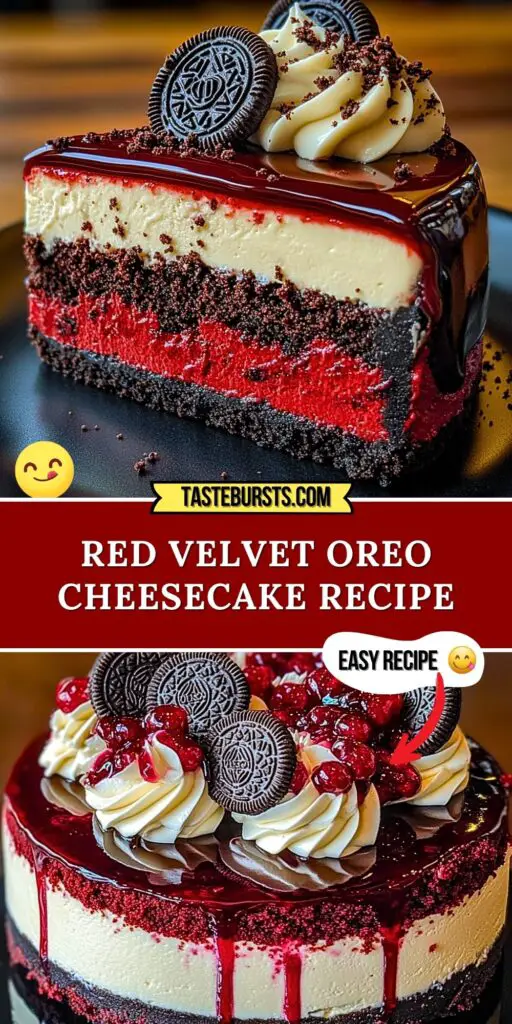
If you’re a fan of rich, indulgent desserts, then the Red Velvet Oreo Cheesecake will steal your heart. This dessert combines the classic decadence of a red velvet cake with the creamy richness of cheesecake, all topped off with the irresistible crunch of Oreo cookies. With three glorious layers of flavor—moist red velvet cake, creamy cheesecake, and a chocolatey Oreo crust—this cheesecake is a showstopper. It’s perfect for special occasions or just when you want to treat yourself to something extraordinary.
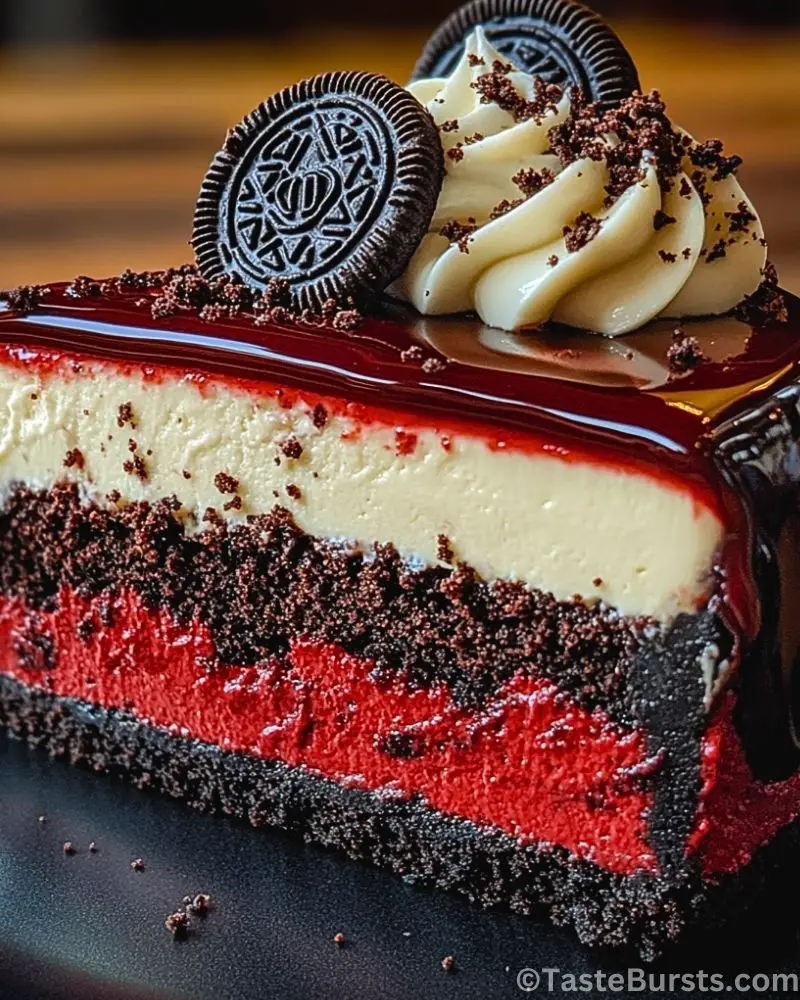
The smooth cream cheese layer balances out the sweetness of the red velvet cake, while the crushed Oreos add a satisfying texture. The red hue from the cake and the glossy chocolate topping give it an eye-catching appearance that will impress anyone who sees it. If you’re looking for a dessert that’s as delightful to look at as it is to eat, this Red Velvet Oreo Cheesecake is a must-try.
Why You’ll Love This Red Velvet Oreo Cheesecake
This Red Velvet Oreo Cheesecake has something for everyone. Whether you’re a fan of cakes, cheesecake, or cookies, this dessert brings all your favorite elements together in one glorious bite. The red velvet layer is moist and fluffy, providing a perfect contrast to the creamy and tangy cheesecake layer. The Oreo crust adds the perfect crunch and deep chocolate flavor that pairs beautifully with the rich cake and smooth cream cheese filling. Not only is it a treat for the taste buds, but it also makes for an impressive presentation at any gathering. It’s the ultimate indulgence!
Preparation Phase & Tools to Use
Before you begin making this Red Velvet Oreo Cheesecake, it’s essential to gather the right tools to ensure your creation turns out perfectly. Here’s a list of the tools you’ll need:
- Springform Pan (9-inch)
This is an absolute must when making cheesecakes. The springform pan allows for easy removal of the cheesecake after it has set, preserving the shape and texture. The sides can be easily removed, making it perfect for delicate desserts like this one. - Electric Mixer (Hand or Stand)
A hand or stand mixer is crucial for achieving a smooth and creamy cheesecake filling. The mixer will help combine the cream cheese, sugar, and eggs without any lumps, ensuring a silky texture for your cheesecake layer. - Measuring Cups and Spoons
Accurate measurements are key when making a layered cheesecake, especially when working with both dry and wet ingredients. Use proper measuring cups for both liquids and dry ingredients to ensure consistency throughout the process. - Oven
A standard oven is needed for baking the red velvet cake layer. The cake needs to bake evenly, so make sure your oven is preheated to the right temperature before placing your cake batter inside. - Double Boiler (or Microwave)
A double boiler (or microwave) will be necessary for melting the chocolate for the top layer and the Oreo crust. Melting the chocolate over indirect heat ensures that it doesn’t burn, resulting in a smooth, glossy topping. - Mixing Bowls
Having a few large mixing bowls on hand is essential for combining the various ingredients for the different layers. Make sure they are deep enough to hold the mixture comfortably. - Spatula
A spatula is great for scraping down the sides of the mixing bowls and ensuring that all of the ingredients are fully incorporated. It’s especially useful for transferring the cheesecake mixture into the pan smoothly.
By using the right equipment, you’ll have an easier time making the cheesecake and achieve the best results.
Preparation Tips
- Room Temperature Ingredients: Make sure your cream cheese and eggs are at room temperature before you begin. This will allow the ingredients to mix together more easily and help avoid any lumps in your cheesecake filling.
- Chill the Cheesecake: After baking and assembling your cheesecake, it’s essential to let it chill in the refrigerator for at least 4 hours, preferably overnight. This helps the cheesecake set properly, making it easier to slice and serve.
- Crust Consistency: When preparing the Oreo crust, make sure the cookies are finely crushed to ensure a smooth, firm base. If you prefer a firmer crust, press it down well into the bottom of the springform pan before baking.
- Don’t Overmix: Overmixing the cheesecake filling can incorporate too much air into the mixture, causing cracks when it bakes. Mix the filling just until the ingredients are combined and smooth.
- Use High-Quality Ingredients: Since the red velvet cake and cheesecake are the stars of this dessert, be sure to use high-quality cocoa powder, cream cheese, and vanilla extract. This will elevate the flavor and overall result of your cheesecake.
By following these tips, you’ll set yourself up for success and ensure a perfect Red Velvet Oreo Cheesecake.
Ingredients for this Red Velvet Oreo Cheesecake
For this indulgent dessert, you’ll need the following ingredients to create the red velvet cake, cheesecake layers, and Oreo crust. Make sure you have everything on hand before you start, and don’t hesitate to use high-quality ingredients for the best results!
Oreo Crust:
- 1 1/2 cups Oreo crumbs (about 15-20 Oreo cookies)
- 1/4 cup unsalted butter, melted
- 2 tablespoons granulated sugar
Red Velvet Cake Layer:
- 1 1/2 cups all-purpose flour
- 1 cup granulated sugar
- 1 tablespoon cocoa powder (unsweetened)
- 1 teaspoon baking soda
- 1/2 teaspoon salt
- 1 large egg
- 1 cup buttermilk, at room temperature
- 1/2 cup vegetable oil
- 1 tablespoon red food coloring (gel or liquid)
- 1 teaspoon vanilla extract
- 1 teaspoon white vinegar
Cheesecake Layer:
- 3 (8-ounce) packages cream cheese, softened
- 1 cup granulated sugar
- 1 teaspoon vanilla extract
- 3 large eggs, at room temperature
- 1 cup sour cream, at room temperature
Topping:
- 1/2 cup heavy whipping cream
- 1/4 cup semi-sweet chocolate chips
- 4-6 Oreo cookies, crushed (for garnish)
- Whipped cream (optional, for garnish)
Make sure to measure all your ingredients accurately to ensure the perfect consistency and flavor for each layer. With all of these ingredients ready, you’ll be well on your way to creating a stunning Red Velvet Oreo Cheesecake!
Step 1: Prepare the Oreo Crust
- Crush the Oreos: Start by placing the Oreo cookies in a food processor and pulse until they are finely crushed. If you don’t have a food processor, you can place the cookies in a zip-top bag and crush them with a rolling pin.
- Mix with Butter: In a medium-sized bowl, combine the Oreo crumbs with the melted butter and sugar. Stir until everything is evenly mixed, and the crumbs are coated with the butter.
- Press into Pan: Press the Oreo mixture into the bottom of a 9-inch springform pan. Use the back of a spoon or the bottom of a glass to ensure the crust is compact and even.
- Chill the Crust: Place the crust in the fridge to chill while you prepare the red velvet cake layer.
Step 2: Bake the Red Velvet Cake Layer
- Preheat the Oven: Preheat your oven to 350°F (175°C). Grease and flour an 8-inch cake pan (or another 9-inch round pan) for the red velvet layer, or line it with parchment paper for easy removal.
- Mix Dry Ingredients: In a large bowl, sift together the flour, sugar, cocoa powder, baking soda, and salt.
- Combine Wet Ingredients: In a separate bowl, whisk together the egg, buttermilk, vegetable oil, red food coloring, vanilla extract, and vinegar until well combined.
- Combine Wet and Dry Ingredients: Slowly pour the wet ingredients into the dry ingredients, stirring gently to combine. Be careful not to overmix—just mix until you no longer see dry spots.
- Bake the Cake: Pour the batter into the prepared pan and bake for 20-25 minutes, or until a toothpick inserted into the center comes out clean. Let the cake cool completely before moving on to the next step.
Step 3: Make the Cheesecake Layer
- Prep the Cream Cheese: In a large bowl, beat the softened cream cheese with an electric mixer on medium speed until smooth and creamy, about 2-3 minutes.
- Add Sugar and Vanilla: Add the sugar and vanilla extract to the cream cheese and continue beating until combined.
- Add Eggs: Add the eggs, one at a time, beating on low speed after each addition. Be sure to scrape down the sides of the bowl as needed to ensure even mixing.
- Add Sour Cream: Once the eggs are fully incorporated, add the sour cream and mix on low speed until smooth.
Step 4: Assemble the Cake
- Layer the Crust: After the red velvet cake has cooled completely, carefully slice it in half horizontally, creating two layers. Take the top layer and set it aside for now. Place the bottom layer on top of the prepared Oreo crust in the springform pan.
- Add the Cheesecake Layer: Pour the cheesecake filling evenly over the red velvet cake layer. Smooth the top with a spatula.
- Add the Second Layer of Cake: Gently place the second layer of red velvet cake on top of the cheesecake layer, pressing it down slightly to ensure it sticks.
Step 5: Bake the Cheesecake
- Bake the Cheesecake: Place the springform pan in the oven at 325°F (163°C). Bake for 45-50 minutes or until the edges are set but the center is slightly jiggly.
- Cool the Cheesecake: Turn off the oven, crack the oven door, and let the cheesecake cool for about an hour. Then, remove it from the oven and let it cool to room temperature before transferring it to the fridge. Chill for at least 4 hours, but preferably overnight, to allow the layers to fully set.
Step 6: Prepare the Topping
- Melt the Chocolate: In a small saucepan, heat the heavy cream over medium heat until it begins to simmer. Pour the cream over the chocolate chips and let it sit for 2-3 minutes. Stir until smooth and glossy.
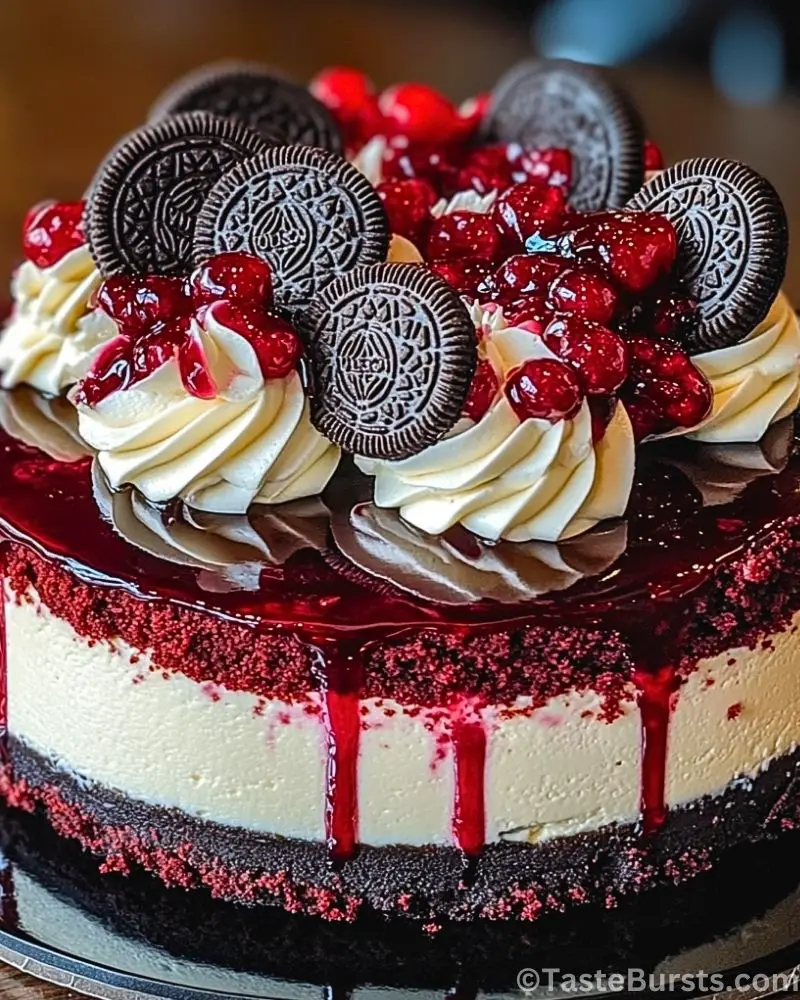
- Pour the Topping: After the cheesecake has chilled and set, pour the chocolate ganache over the top of the cake. Let it drip down the sides for a beautiful effect.
- Garnish: Crush a few Oreo cookies and sprinkle them over the top of the cheesecake for an extra touch of flavor and texture. Optionally, you can add a dollop of whipped cream for an extra layer of indulgence.
With these steps, you will have a stunning and delicious Red Velvet Oreo Cheesecake ready to impress anyone who takes a bite!
Notes
- Chill Time: The cheesecake requires a significant amount of time to chill. Be sure to allow at least 4 hours for it to set properly, but ideally, you should refrigerate it overnight. This ensures the layers firm up and the flavors meld together.
- Cake Texture: If you’re concerned about the texture of the red velvet cake layer, be sure not to overmix the batter. Overmixing can cause the cake to become dense, while mixing just until combined will result in a soft, light texture.
- Oreo Crust Variation: For a different twist, feel free to use golden Oreos for a more subtle flavor or mix in a little bit of chocolate chips with the crushed Oreos for added richness.
- Make It Ahead: This dessert can be made a day in advance, and in fact, it gets even better the longer it chills. This is a great make-ahead option for parties or gatherings!
Watch Out for These Mistakes While Cooking
- Overbaking the Cheesecake Layer: It’s easy to think that the cheesecake needs to be fully set when it comes out of the oven, but it should still have a slight jiggle in the center. Overbaking can cause cracks in the cheesecake and make it dry.
- Forgetting to Preheat the Oven: Preheating your oven to the right temperature is crucial. A cold oven can cause uneven baking, especially for the red velvet cake layer, which needs to bake evenly.
- Not Cooling the Cake Properly: Let the red velvet cake cool completely before assembling the cheesecake. If you assemble it while the cake is still warm, it may melt the cheesecake layer or cause it to slide out of place.
- Rushing the Chilling Process: Don’t rush the chilling time! Cheesecakes need ample time to set and firm up in the refrigerator. Cutting into it too soon can cause the layers to collapse or run into each other.
- Uneven Layering: When assembling the cheesecake, make sure each layer is even. If the layers are uneven, your cake may not bake properly and could result in a lopsided dessert.
By keeping these tips in mind and avoiding these common mistakes, you’ll have a perfect Red Velvet Oreo Cheesecake every time!
What to Serve with Red Velvet Oreo Cheesecake?
This indulgent Red Velvet Oreo Cheesecake is a showstopper all on its own, but pairing it with the right sides can elevate the entire experience. Here are some excellent suggestions for what to serve alongside it to enhance its flavors and create a well-rounded dessert spread.
8 Recommendations for Pairing:
- Fresh Berries
A handful of fresh raspberries, strawberries, or blueberries provides a refreshing contrast to the rich and creamy cheesecake. The natural tartness of the berries balances the sweetness of the cake beautifully. - Vanilla Ice Cream
A scoop of vanilla ice cream is a classic pairing with cheesecake. The cold and creamy texture complements the rich, dense cheesecake layers while adding a creamy contrast to the cake’s texture. - Chocolate Ganache Drizzle
For an extra indulgent touch, drizzle some extra warm chocolate ganache over the cheesecake. The deep, glossy chocolate will complement the red velvet flavor and add an extra layer of decadence. - Whipped Cream
Light, fluffy whipped cream is always a good match for a heavy dessert like this one. The airy texture cuts through the richness, creating a delicate balance of flavors. - Caramel Sauce
Drizzling a bit of caramel sauce over the top or serving it alongside adds a sweet, buttery flavor that pairs beautifully with the tangy cream cheese filling. - Coffee or Espresso
The boldness of coffee or espresso pairs perfectly with the sweetness of the cheesecake. If you’re serving this at a gathering or dinner party, offering coffee alongside will elevate the experience for your guests. - Chocolate-Covered Strawberries
A luxurious treat like chocolate-covered strawberries adds a sophisticated touch to your dessert table and pairs wonderfully with the flavors in the Red Velvet Oreo Cheesecake. - Ice Cold Milk
Sometimes, there’s nothing better than a glass of cold milk to accompany a rich, sweet dessert. It cuts through the sweetness and provides the perfect refreshment between bites of cheesecake.
These pairings will make your Red Velvet Oreo Cheesecake even more delicious and give your guests a variety of flavors and textures to enjoy alongside the main dessert.
Storage Instructions
To keep your Red Velvet Oreo Cheesecake fresh and delicious, proper storage is key. Here’s how to store it:
- Refrigeration: Since this cheesecake contains cream cheese and other dairy products, it needs to be kept in the refrigerator. After you’ve prepared the cheesecake and it has chilled, cover the springform pan with plastic wrap or transfer the cheesecake to an airtight container. Store it in the refrigerator for up to 5-7 days.
- Freezing: If you want to store it for a longer period, you can freeze the cheesecake. Wrap it tightly in plastic wrap and then aluminum foil to prevent freezer burn. You can store it in the freezer for up to 2-3 months. To thaw, remove it from the freezer and refrigerate overnight before serving.
- Sliced Cheesecake: If you have leftover slices, place them in an airtight container or wrap each slice individually in plastic wrap. They can be refrigerated for 3-4 days or frozen for up to 1-2 months.
Estimated Nutrition
Here’s a general idea of the nutritional information for a slice of Red Velvet Oreo Cheesecake (assuming 12 slices per cheesecake):
- Calories: 450-500 per slice
- Total Fat: 28g
- Saturated Fat: 14g
- Trans Fat: 0g
- Cholesterol: 90mg
- Sodium: 250mg
- Total Carbohydrates: 53g
- Dietary Fiber: 2g
- Sugars: 35g
- Protein: 6g
- Vitamin A: 12%
- Vitamin C: 0%
- Calcium: 8%
- Iron: 5%
Keep in mind that the actual nutritional values may vary depending on ingredient brands and portion sizes.
Frequently Asked Questions
1. Can I make the Red Velvet Oreo Cheesecake ahead of time?
Yes! This cheesecake is actually better when made ahead. After assembling and baking it, refrigerate for at least 4 hours, preferably overnight. This gives the layers time to set and the flavors to meld, making it even more delicious the next day.
2. Can I use a different type of cookie for the crust?
Absolutely! While Oreos give the crust a classic, rich flavor, you can substitute them with other cookies such as graham crackers, chocolate chip cookies, or even Biscoff cookies for a different taste. Just be sure to adjust the amount of sugar and butter based on the cookies you use.
3. Can I make a gluten-free version of this cheesecake?
Yes, you can! To make this cheesecake gluten-free, substitute the all-purpose flour in the red velvet cake layer with a gluten-free flour blend. For the Oreo crust, you can find gluten-free Oreos or use another gluten-free cookie for the base.
4. How do I know when the cheesecake is done baking?
When baking the cheesecake, it’s normal for the center to still be a bit jiggly. The edges should be set, and the center should have a slight wobble when you gently shake the pan. If the cheesecake is overbaked, it may crack, so be sure to watch it closely.
5. Can I freeze the Red Velvet Oreo Cheesecake?
Yes! You can freeze this cheesecake. After it has fully set in the refrigerator, wrap it tightly in plastic wrap and aluminum foil, and freeze it for up to 2-3 months. Thaw it in the fridge overnight before serving.
6. How should I slice the cheesecake without making a mess?
To get clean slices, use a sharp knife that has been dipped in warm water and wiped dry before each cut. This will help the knife glide through the layers smoothly, giving you clean slices without any sticking.
7. Can I make the cheesecake without the red food coloring?
Yes, you can skip the food coloring if you prefer. The red color is simply for visual appeal, so omitting it won’t affect the taste of the cake, though it will no longer have that signature red velvet appearance.
8. What can I substitute for sour cream in the cheesecake layer?
If you don’t have sour cream, you can use Greek yogurt as a substitute. It will give the cheesecake layer a slightly tangier flavor, but it will still provide the necessary creaminess and texture.
Conclusion
The Red Velvet Oreo Cheesecake is a rich, decadent dessert that’s sure to impress anyone who tries it. With its beautiful layers of red velvet cake, creamy cheesecake filling, and a crunchy Oreo crust, it combines all the best flavors into one stunning dish. Whether you’re celebrating a special occasion or simply treating yourself, this cheesecake is the perfect choice. With some preparation and patience, you’ll have a dessert that’s as visually appealing as it is delicious, making it a memorable highlight at any gathering. Enjoy!