Bright, nostalgic, and loaded with creamy goodness—this No-Bake Twinkie Pudding Cake is a delightful dessert that brings smiles with every bite. It’s a sweet tribute to childhood treats, combining soft golden Twinkies with layers of whipped topping, creamy pudding, and a pop of cherry cheer. There’s no oven needed, making it the ultimate easy dessert for busy days or last-minute gatherings. Whether you’re making it for a potluck, birthday party, or just because you need something sweet and sunny, this cake delivers on flavor and ease.
What sets this dessert apart is how little effort it takes to put together something that tastes so indulgent. The soft sponge of the Twinkies soaks up just enough cream to become melt-in-your-mouth tender, while the pudding layer adds silky richness. Topped off with a whipped cream cloud and juicy cherries, this dessert is all about texture, contrast, and pure joy. It’s light yet satisfying, playful yet elegant—ideal for anyone who wants a fuss-free sweet treat with maximum payoff.
Ingredients for No-Bake Twinkie Pudding Cake
- 8–10 Twinkies (cut lengthwise to open them flat)
- 1 box (3.4 oz) instant vanilla pudding mix
- 2 cups cold milk
- 1 container (8 oz) whipped topping (like Cool Whip), thawed
- 1 can cherry pie filling or maraschino cherries (drained if using whole cherries)
- Optional: chopped nuts, mini chocolate chips, or shredded coconut for garnish
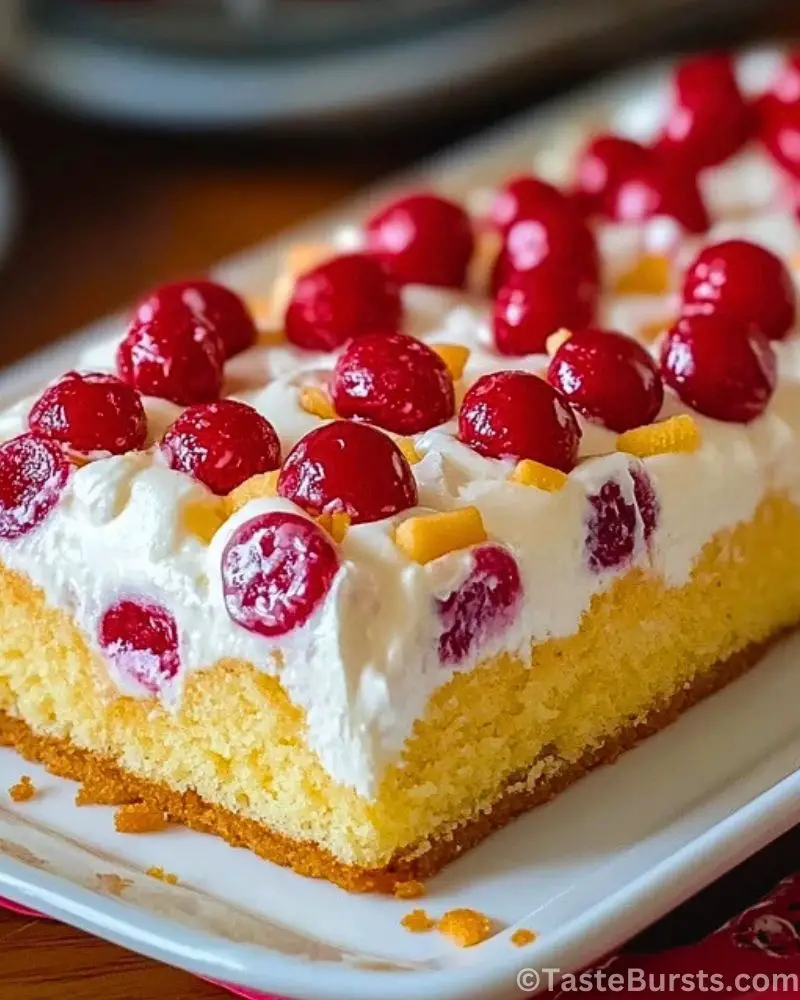
- Optional: small chunks of cheddar cheese (for a salty-sweet twist as shown in the image)
Step 1: Prepare the Base
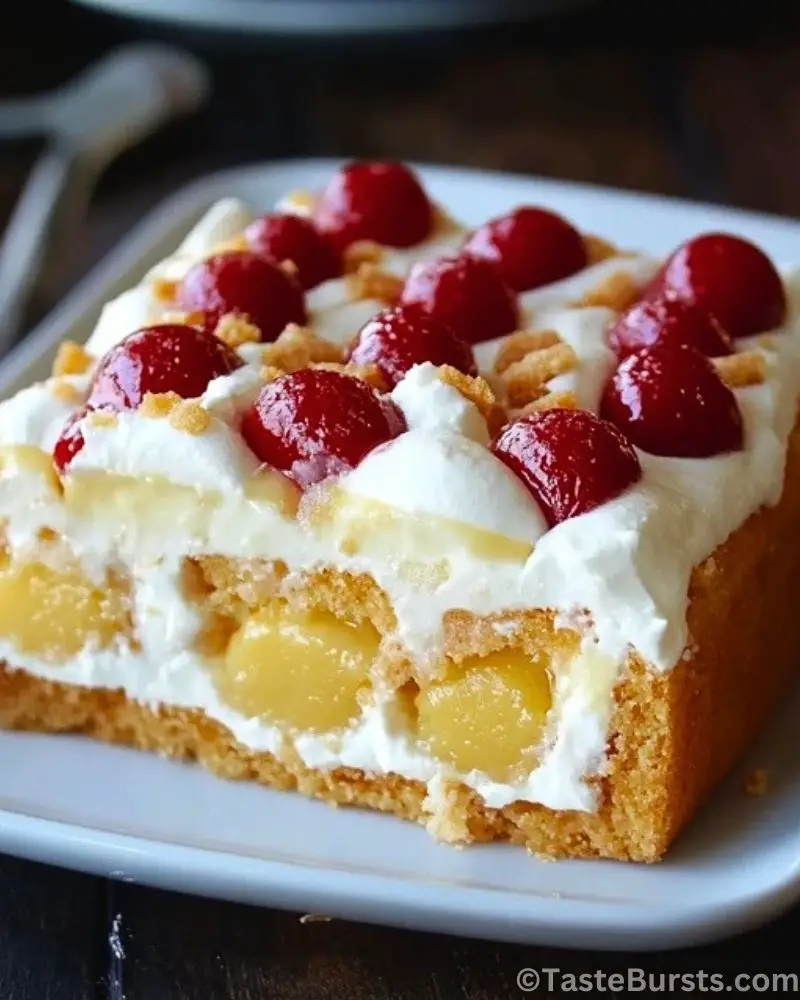
Begin by slicing the Twinkies in half lengthwise. Arrange them, cream-side up, in a single layer across the bottom of a 9×13-inch dish. This will form the cake’s “sponge” layer, giving it that classic golden look and nostalgic flavor.
Step 2: Mix the Pudding
In a large mixing bowl, whisk together the vanilla pudding mix and cold milk for about 2 minutes, or until the pudding begins to thicken. Let it sit for another minute to set slightly—this ensures a velvety, stable layer for the cake.
Step 3: Layer the Pudding
Pour the prepared pudding evenly over the Twinkies. Use a spatula to gently spread it across the dish, making sure all the Twinkies are covered. This creamy layer will soak slightly into the sponge, making the cake incredibly moist and rich.
Step 4: Add the Whipped Topping
Spread the thawed whipped topping over the pudding layer. This fluffy layer adds a light, airy contrast to the dense pudding and sponge base.
Step 5: Decorate with Cherries
Top with either cherry pie filling or place individual maraschino cherries across the surface of the cake, as shown in the image. For an extra fun twist, sprinkle with your choice of garnish—try chopped nuts, mini chocolate chips, or even tiny cheddar cubes for a bold sweet-and-savory pop.
Step 6: Chill and Set
Refrigerate the assembled cake for at least 4 hours, or overnight if possible. This allows the flavors to meld and the textures to firm up for perfect slicing.
Storage Instructions
To keep your No-Bake Twinkie Pudding Cake fresh and delicious:
- Refrigerate: Always store the cake in the refrigerator, covered tightly with plastic wrap or in an airtight container. It will stay fresh for up to 4 days.
- Avoid freezing: Due to the whipped topping and pudding, freezing is not recommended as the texture may become watery or separate once thawed.
- Make ahead: This dessert is perfect to prepare a day in advance. In fact, the flavors are even better after sitting overnight.
Estimated Nutrition (per serving, based on 12 servings)
- Calories: 290
- Total Fat: 10g
- Saturated Fat: 5g
- Cholesterol: 20mg
- Sodium: 300mg
- Total Carbohydrates: 45g
- Sugars: 30g
- Protein: 3g
Note: Nutrition may vary depending on brand of ingredients used.
Frequently Asked Questions
What can I use instead of Twinkies?
You can substitute Twinkies with sponge cake slices, pound cake, or ladyfingers if preferred. Just ensure the base is light and slightly sweet.
Can I use homemade pudding?
Absolutely! If you prefer to make pudding from scratch, go for it. Just ensure it’s thick enough to hold when layered.
How long does this cake need to chill?
Ideally, chill it for at least 4 hours, but overnight is best to let the flavors meld and layers set properly.
Can I make this gluten-free?
Yes—use a gluten-free sponge or cake base, and make sure the pudding and whipped topping are certified gluten-free.
Can I add other fruits?
Definitely. Sliced bananas, strawberries, or pineapple chunks go great with the creamy layers. Just make sure they’re patted dry to avoid excess moisture.
Is it too sweet?
It’s sweet, yes—but not overwhelmingly so. You can cut back on sweetness by using sugar-free pudding or whipped topping.
Can kids help make this?
Yes! This is a fantastic no-bake recipe that’s fun and easy for kids to help with—especially layering the ingredients and decorating.
What’s the best way to slice it cleanly?
Use a sharp knife dipped in hot water and wiped dry before slicing. Repeat between cuts for clean slices.